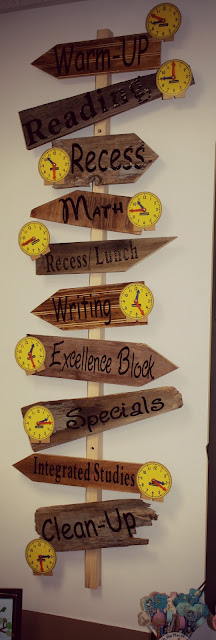
As I promised in my 'Back to School' post...the tutorial for my 'Daily Schedule' sign.
When I decided to change the theme of my classroom to Dr. Seuss'...Oh the Places, I saw this paper sign and thought it was cute and would be perfect for my classroom. But, I knew that my husband could make me one out of the scrap wood (we have in our garage) and that it would be much cuter than just plain ole' paper.
When I decided to change the theme of my classroom to Dr. Seuss'...Oh the Places, I saw this paper sign and thought it was cute and would be perfect for my classroom. But, I knew that my husband could make me one out of the scrap wood (we have in our garage) and that it would be much cuter than just plain ole' paper.
The first step is to find the wood you want to use.
We used: barn wood, plywood, and bead board.
Then, you decide how wide & long you want your signs to be and cut them. I varied the lengths of mine: some of the barn wood is longer because I wanted those to stay the length they were.
The next step is cutting the angles, depending on which way you want them to go.
When you are finished cutting all of the wood, you need to decide the order of the signs. I just laid them on the post and switched them around playing with how it looked.
Then the fun part...gluing and nailing them in place.
The picture below shows the sign without stain...I liked this look, but then decided that it was too much of a contrast (the raw wood with the barn wood) so I stained the raw wood with some stain we already had.
Then the fun part...gluing and nailing them in place.
The picture below shows the sign without stain...I liked this look, but then decided that it was too much of a contrast (the raw wood with the barn wood) so I stained the raw wood with some stain we already had.
After the sign was finished, my husband attached it to the wall with screws.
My friend Tabatha cut out the vinyl words using her plotter and I put them up after the sign was on the wall (we didn't have our schedule yet).
After about a week, the students kept asking me what time recess was, so I decided that we needed clocks. I hot glued some mini clocks (I already had) onto each subject. The clocks are also a great tool for the students to practice telling time
I think this would be a great idea for a child's bedroom. You could put their place of birth at the top and all of the places they have been or put inspirational words on each sign. Maybe someday I will put one of these in my spare room for my grandchildren.
~Julie
P.S. I have to share with you, something my daughter made for my classroom...I absolutely love it!
I am going to take a picture of my students (with their favorite color of crayon or maybe have each of them hold an open box of crayons) and hang it underneath. I can't wait for all of them to see it...I know they will love it!


No comments:
Post a Comment