Happy Monday!
Today I want to share with you my Valentine's Day Banner. This one may need a little bit of work, but I promise it's simple because it doesn't have to be perfect. Actually, the imperfections are what give it charm!
Cute, right?
The main materials you will need are:
~ Muslin material
~ Printed material of your choice
~ Interfacing (so your banner pieces are sturdy)
~ Ruler
~ Rotary Cutter
~ Cutting mat
~ Sewing machine
~ Card stock (or other letters of your choice)
~ Scrap pieces of red material
~ Jute, Twine or any string of your choice
Here is what to do....
First thing to do is cut your muslin material and interfacing panels. For your muslin panel, you will need to cut 2 per letter, one for the front and one for the back. So, I simply folded the material in half and cut so I would be cutting 2 panels at a time. You can cut them any length or width depending on how big or small you want your banner to be, but for the sake of this tutorial, I will share with you my measurements. I wanted mine large, so I cut my muslin into 16" x 13" panels and my interfacing into 14" x 10 1/2" panels. Honestly, I eyeballed the whole thing!
Next, iron your muslin panel so that when you iron on the interfacing, there won't be any creases.
Once your muslin panels are flat, iron on your interfacing. The interfacing should come with instructions on which side you iron. I used one sided interfacing, so I placed the shiny side down on my muslin and ironed. You can use your highest setting on your iron to speed up the process. Just keep the iron moving.
Next, take your other muslin panel and line it up over the one you just ironed the interfacing on and sew them together. This is where the imperfection comes in! If the pieces don't line up perfectly, great! You want raw edges...really raw! So that I had a somewhat of a straight stich, I followed along the interfacing. It may be hard to see with some lighting, but you can feel it as you go. If the stich isn't straight, yay!
Here is the finished panel. You can see the outline of the interfacing....sort of.
Next, you will sew one more straight line all the way across the top of the panel in order to create a space for the jute.
Now it's time to attached the printed material. Cut and iron those pieces. I measured mine about 13" x 10".
Next, pin it to your muslin panel and sew it on to attach it. Again, your stich doesn't have to be straight.
You can kind of see my hem!
Now it's time to apply the letters. I used my Cricut to cut these out (you can use your Silhouette if you have one), but if you don't have either, you may be able to purchase these letters at your local craft store. I attached mine with spray adhesive.
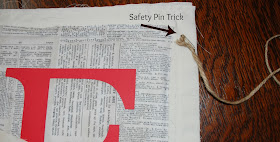
Next comes the stringing. A little trick I learned from my mom is to attach a safety pin to the end of the string so you have something to pull through. It can be difficult with the jute, so make sure you weave it through a few time so it holds firm.
I had some scraps of red material I cut into strips and tied it onto the banner in between the panels and on each end for a little more effect. You can always tie ribbon too!
Here is a close up of the scrap pieces tied on.
And that's it! I know it seems like a lot of sewing, but it goes quick because your lines don't have to be perfectly straight and you're sewing straight lines. Don't be afraid to be imperfect!
Keep watching for more Valentine's Day décor and gift ideas from Julie and myself!
~ Kerri


very cute!
ReplyDeleteToo cute! Great idea!
ReplyDeleteCute banner!
ReplyDeleteHugs, Lynnie