Monday, September 30, 2013

Lucas Brian Is Here...A Birth Story

Today I would like to share with you a Huge Snippet of Creation (oxymoron, I know), but on Monday, September 23rd at 5:12 PM, my family welcomed a new member...Lucas Brian Gastineau
 
After my water broke Sunday night, we took our time getting to the hospital and were finally checked in at about midnight.  At 6:30 am, I wasn't having many contractions, so they started me on Pitocin.  That really sped things up to the point I was having contractions every 2 minutes (no time to breath), so I said it's epidural time.
Side note, my first baby was breach, so it was a simple scheduled cesarean; therefore, I never experienced labor...I have now!
 
At about 10:30, I got my epidural and laid back for a few hours.  By 3 pm I was fully dilated and ready to start pushing.  The nurse didn't think I would progress that fast, so while she got the room ready, I tried to "labor down and at about 4 pm I started pushing. Lucas didn't like the pushing because his heart rate went down really low, so the nurses brought in the doctor who felt using the vacuum would be the safest way to go and I agreed. So, at about 4:50 pm I started pushing again and after 25 min of that, he came out! 

Here is the cutest picture of Eliana. The nurses kept her busy...

Since he came out so fast, there wasn't a lot of time to clear out his lungs, so the baby nurses thought they heard some respiratory problems, which
meant he was off to the NICU where they did x-rays and blood tests.

 
 One of the blood tests they did took 48 hours to get results so we were stuck in the hospital until then.  Luckily, I was able to stay in 'Postpartum,' but I had to be in the NICU every 3 hours to feed him....talk about a long night!
 
After the 48 hours were up and all the test results came back good, we had one more battle to fight...jaundice.  Although, it's common in infants, the fact that he was in the NICU, they wanted it to improve before discharging him just in case there were any untreated infections.  This meant at least one more night in the NICU!  Ugh!!!  I had been discharged from Postpartum, so I spent the night in the NICU room with Lucas, again, getting barely any sleep since I was in pain, sleeping on a fold-out chair and waking up every 3 hours to feed him, which I didn't mention earlier, takes about an hour.  So I had only 2 hours to go to the bathroom, settle into the chair and fall asleep!
 
The next morning we got good news...we were able to go home!  The doctor felt he would do fine at home with the help of photo therapy, which is basically lights that he has to be exposed to in order to help reduce the bilirubin levels, which causes jaundice. So, we got the photo therapy machine and headed home.  Below is a picture of Lucas getting his photo therapy treatment, which he needs 24 hours. 
 
 
Hopefully in a few days, we will have a good blood test that says his bilirubin level is under control and we can start a normal life/routine with Lucas.  Until then, we are all enjoying his sweet face.  Eliana is wonderful with him.  She loves having a baby brother!

A special thank you to my mom who helped me get through the contractions and put things in perspective when I was having a meltdown from the pain.
Another special thank you to Julie for holding down the fort last week by posting all three days.
And finally, my biggest special thank you to my amazing husband who was there with me every second to encourage, pray with and for and get me whatever I needed.  I have a good man!
 
~ Kerri

Friday, September 27, 2013

Food Frenzy Friday (Individual Apple Crisp Pies)

I thought it would be appropriate to make an apple dessert, since it is apple season.  Besides...I had 3 apples that were starting to wrinkle a bit, so I needed to do something with them.  
Every year I make apple crisp for my family, but this year it is only my husband and me.  I didn't want to make the normal 9x13 pan of apple crisp, so I decided individuals would be great.
A few weeks ago I tried these individual peach pie desserts on my 'Pies' Pinterest board.  I have to say both of us (my husband & I) ended up throwing our individual peach pies out.  We both realized that we don't care for baked peaches & that I will never make any type of bake peach again.  
On the 'individual peach pie' website, they said that you could use the same method with apples.  
That is where I got the idea of making an individual apple pie, but I made it my own by adding the (apple) crisp to the middle of the pie & topping each pie with the remaining apple crisp.

What you will need:
Apples (any variety), store bought pie crust (or your own recipe), brown sugar, oatmeal, butter, cinnamon & sugar.
Directions:
Preheat oven to 400 degrees.
Peel and core the apples.
Cut the apples in half.
Stuff the apples with crisp filling (see below recipe).
Roll out the pie crust (just a bit), sprinkle with cinnamon & sugar.  
Cut the pie crust in 1/4 (or less depending on how many apples you are using). 
Wrap the apples with the pie crust.
Place in a shallow pan (8x8 or 9x13 depending on how many apples).
Poke crust with fork.
Sprinkle with the remaining apple crisp topping.
Bake for 15-20 minutes (uncovered) or until the crust is a light brown and the apples are baked. 
I poked a fork into one of the apples to make sure they were the consistency I wanted.
Top with vanilla ice cream & ENJOY!
Apple Crisp Filling:
1 Cup Brown Sugar
1/2 Cup Oats 
2 TBLS. Butter
Mix together brown sugar and oats.  
Cut in butter. 

The best part about this recipe...it was easy!  
I hope this jump starts your fall baking!
~Julie

Wednesday, September 25, 2013

Chore Chart


Today I want to share with you a 'Class Jobs' Chart I made for my classroom, but I think it would be cute for a 'Chores' chart for young children.
This project was very easy and almost free (the best kind of project out there, as far as I am concerned). 
The boards were precut and just lying around our workroom at school (they have been there since I have been at the school, 6 years), so I brought them home.  
I knew I could find a great use for them and I did!  
I had the ribbon and chalkboard paint, the only thing I had to buy were the tags (Hobby Lobby for $1.99) and the clothes pins (Walmart for $1.88 for a box of 12). 

Directions:
Cut the boards to the desired length (if you don't have precut wood).
Drill the holes. 
(I measured in an inch from each side and drilled them; I am not sure what size drill bit I used...SORRY)
Paint with chalkboard paint (I used RUST-OLEUM).
Tie ribbon at the top to hang.
Hot glue clothes pins to the board.
Write the words above the clothes pin.
Write the chore or name on the tag.

*I wrote the class job in chalk, but you could write your child's name and write the chore on the tags to hang on the clip for each child or you could write the price for each chore and they can choose which chore they want to do.  You can determine what you want to write in chalk and what you would like on each tag.
Below are pictures of the process.  I forgot to take a picture of hot gluing the clothes pins on though.  As usual, I didn't measure where I placed them...I just eye-balled it.  I think they turned out to be pretty even.
 You never know...a cute chore chart may encourage your children to do their chores!  I wish I would have had one of these when my kiddos were young (instead of the boring calendar I used).
Hopefully this will motivate you to create for your kids, so they are inspired to do their chores around the house (it's worth a try).
~Julie

Monday, September 23, 2013

Halloween Witch Wreath

Since there are so many Halloween decorations out in the stores, I thought I would share the wreath I made (with Tabatha of course).  
I have to be honest with you...I am not a fan of Halloween!  But there are some cute decorations out there, so we decided to do a Halloween project and this is what we came up with! 

Here are the supplies you will need:
Witch's Hat, Broom, Ribbon, Wire Wreath, Burlap, Floral Wire, Hot Glue

We saw this pin on Pinterest and thought it was cute and decided to give it a try, we made a few changes to our witch though.  I do have to say, the burlap wreath was a bit time consuming.  There was no tutorial for this wreath (on the pin) since it was an Etsy item, so we found this tutorial for the burlap part of the wreath.
After we got the burlap part of the wreath done, we hot glued the hat to the wreath and attached the broom with floral wire.  Then, we made the bow (I didn't take a picture of that...SORRY) and hot glued it onto the hat. 
 We weren't going to put legs on the witch, but once we put it together we felt that we needed to put some on to add some cuteness!  I really didn't want to sew any legs, so we brainstormed and came up with using yardsticks (which I had).  
I did however, sew the witch's shoes (I just cut them freehand).  After I sewed the shoes, we stuffed them, hot glued them to the yardsticks and used floral wire to attach the yardsticks to the wreath.
I hope this gives you some inspiration to create!
~Julie

Friday, September 20, 2013

Food Frenzy Friday ~ Baked Penne With Spinach

Happy Friday!!! 
 
Today I want to share with you an easy (and freezer-friendly) recipe I came across. It's from Real Simple.com. 

Here is the recipe ~

Ingredients:
·         1 tablespoon olive oil
·         cloves garlic, chopped
·         1/4 cup oil-packed sun-dried tomatoes, chopped
·         1 15-ounce can or half of a 28-ounce can of crushed tomatoes
·         1 28-ounce can whole tomatoes
·         1 tablespoon balsamic vinegar
·         kosher salt and black pepper
·         12 ounces penne (3/4 box)
·         5-ounce package baby spinach
·         8 ounces mozzarella, grated (about 2 cups)
·         2 tablespoons grated Parmesan (about 1/2 ounce)
·         1 lb lean ground beef (my addition)
·         green salad, for serving

Directions:
  • Heat oven to 400° F. Heat the oil in a large saucepan over medium heat. Add the garlic and sun-dried tomatoes. Cook, stirring, for 2 minutes. Add the crushed tomatoes.
  • Cut up the whole tomatoes in the can with scissors or crush by hand. Add to the saucepan with the vinegar, ½ teaspoon salt, and ¼ teaspoon pepper. Simmer, stirring occasionally, until thickened, 15 to 20 minutes. 
  • Meanwhile, bring a large pot of water to a boil. Add 1 tablespoon salt. Cook the penne for half the package directions’ recommended time. 
  • Add the spinach to the sauce and cook, stirring, until it begins to wilt, about 1 minute. Add the drained pasta and toss to combine. 
  • Place half the pasta mixture in an 8-inch square baking dish and sprinkle with 1 cup of the mozzarella. Top with the remaining pasta and sprinkle with the remaining 1 cup mozzarella and Parmesan.
  • Place the baking dish on a rimmed baking sheet and bake until bubbling and beginning to brown, 15 to 20 minutes.
  • Serve with the salad (if desired).

Here is what it looked like when it came out of the oven 

Delicious, easy and you can freeze the leftovers!!!
 
    Enjoy!
    ~ Kerri   


Monday, September 16, 2013

Entertainment Console Table

While thumbing through Pinterest, I found this amazing Entertainment Console Table that would be perfect to go under our television & the best part was that it came with instructions, so I put my hubby to work!
 
This picture came from Saved By Love Creations website.  She got the plans from Ana White's Website.
 
My husband modified the plans to shorten the length of the table by a little more than a foot.  Here is how ours turned out... 
 
After my husband built it (with some help from Julie's husband, Craig) using these plans for Ana White's Rustic X Console (sorry I didn't take pics) I distressed it with water & baking soda. This is a method that works great on redwood and cedar wood ~ we used redwood. Using these instructions from Ehow.com, I applied the mixture all over the console and left it to dry for 24 hours.
 
 The picture below shows you the process and how different the wood looks after the application dries.
 
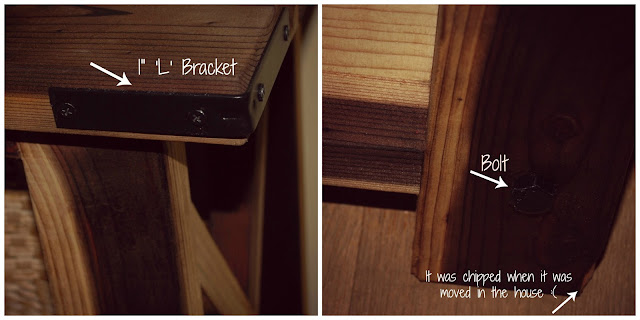
After the console was dry, we applied one layer of wood sealant, let that dry and then added the hardware. We added 3" 'L' brackets to the corners & bolts to the bottom, one on each leg. We weren't able to find black ones in the stores, so we purchased the silver ones and spray painted them using my favorite Rust-Oleum 2X Ultra Cover Black Flat.
 
The last step was to add the décor! Thanks to Home Goods and Ross, I found pieces to add to what I already had. What I love about this piece is that it is open and allows for the room to flow better.
 
A special thanks to my husband who is the most handy CPA I know!!! Love you babe!
 
~ Kerri
 

Friday, September 13, 2013

Food Frenzy Friday (Creamy Guacamole)

Today I am sharing with you an all time favorite at our house.  If you love guacamole, you will love this.  It is super EASY and super DELICIOUS!  
The recipe calls for 2-3 (I use 3) avocados, red onion (I use about a TBLS.), 1 vine ripe tomato, 1 garlic clove, 1tsp (or more depending on how spicy you want it) jalapeno, 1 TBLS. lime juice, salt and pepper to taste.

Directions:
Mash avocados, stir in the lime juice, and the
      salt, and pepper until it has a creamy consistency.
Mince garlic clove.
Finely chop jalapeno and onion.
Seed and dice the tomato.
Fold together all ingredients. 
Then enjoy with tortilla chips!
~Julie

Wednesday, September 11, 2013

Bathroom Rules Sign

We recently upgraded a few things in our bathroom such as the shower curtain, color scheme and sink, which I LOVE because it has drawers (our last sink was a pedestal sink). I have always wanted to get rid of my guest towel and use the guest paper towels ~ because I'm a sanitary freak ~ and this new sink allowed me to do that.
 
What else it allowed me to do was hang a cute bathroom rules sign on the hook where the towel used to be...

Here is my bathroom rules sign

I started by going online to find cute wording from other bathroom rule signs and this one I chose seemed to fit our family the best.  So, I typed it up on Word and added a cute clip art I also found online.  Then I found a frame I already had and began creating.
 
In order to match the colors in my bathroom, I spray painted the frame using Rust-Oleum 2X Ultra Cover spray paint ~ my go-to brand!
 
Once it dried, I sanded it down a little bit to give it a distressed look.

Then I put it all together and added some ribbon I had to hang it and ta-da...a new bathroom rules sign that cost me zero dollars!!!
 
P.S. Here is my new shower curtain...yellow, white & tan!  I love the colors!!
 
~ Kerri

Monday, September 9, 2013

Master Bedroom Wall Makeover

 This is such an exciting tutorial for me!  
I did it all by myself while my husband was out of town.  
He was visiting our daughter (Madi) & his brothers and their families.  
We have had our headboard for at least 15 years and I have always tried to figure out what to hang above it, because it is curved.  I thought it would look funny with something straight...so I have searched and searched for something since we have had it. Well I never found anything until now.
This is our headboard. 
 Like I said, we have had this furniture for at least 15 years and I still love it.  
One day I will give you a tour of our house, but for now we are sticking to this wall.

This is the piece that started this project.  
I get daily emails from Pick your Plum and one day the 'Plum' of the day were these canvas'.  They had samples of different states, names, and dates on them.  When I saw them and the price ($9.99), I knew this was the answer to my dilemma.  Of course, it took me forever before I figured out which option I wanted...sometimes I have issues like that.  
I decided that this would be the center of the wall.   I knew the size of frame it would require would not even begin to fill up that space.  Then, I had an idea...the letters of our first names would be a great addition and barn wood...who doesn't love barn wood? 
I found the letters at Hobby Lobby, but they were black and I wanted cream color to match the furniture.  So I spray painted (Krylon Satin White) them and then distressed them with sand paper and ink (to darken the edges & turn them a cream color).  After I used the ink, I wiped them down with a cloth to get rid of the excess ink.

BARN WOOD SIGN:
Most people don't have barn wood hanging out in their garage, but we DO.  I guess you could say we are hoarders of some sorts, at least when it comes to cool stuff like barn wood.  The hardest part in making this was climbing up on the stool to find the pieces I wanted to use.  
I found 4 pieces of wood that were roughly the same size in width and length.  I figured that I needed 4 because I was using an 11x14 frame (see below) and that gave a little extra on the top and bottom of the wood.  One of the boards was too long so I cut about 12 inches off with the chop saw.
 To attach the boards to one another I used flat brackets.  I got these at Walmart for $1.57 a pack.  There were 4 brackets and 8 screws in each pack, I needed 3 packs, because I needed 9 brackets.  I didn't measure where to put them, I just spread them out evenly to attach the boards to one another. 

 The top, left picture shows what came from Pick your Plum'...the button is wood (& super cute).  I tied a bow with embroidery thread.  I do not know the number or brand of the thread because I have had it for years and it was just twisted on a piece of cardboard.  It is kind of a coral color.  The frame is from Hobby Lobby (like I said earlier)...I want to say it was $15 when it was half price.  I also used a plain white mat (from Hobby Lobby as well) because the canvas was an 8x10.

This is a sign my husband and I made last year, it is the first thing you see when you walk into our bedroom.  I knew that using more barn wood would tie the room together.

FINISHED PRODUCT:
I even hung it before Craig (my husband) got home.  Yes, I even used the stud finder and screwed it right into the studs.
 I am very pleased with the finished project!
Hope this inspires you to create.
~Julie

Friday, September 6, 2013

My Own Iced Coffee

I'm not sure what the weather is like where you live, but it has been in the 100's here in East County San Diego!  And because I love my coffee in the morning (and Starbucks gets expensive), I created my own Iced Coffee to enjoy!
 

If you have a Keurig, then this is what to do....
I used Costco's Kirkland brand 'Pacific Bold' k-cups (it's is less expensive and just as good as the Starbucks k-cups) & 3 Vanilla Carmel Coffee-mate creamers.


I start by putting the creamers in a coffee mug, then I brew the coffee ~ this helps stir the creamer without having to dirty a spoon!
 
I then put the coffee in the freezer for about 20 min. If I thought ahead, I would do this the night before and leave it in the refrigerator over night so I wouldn't have to wait to cool it down, but I'm not always thinking that far ahead!
 
When the 20 (or so) minutes are up, I pull the mug out of the freezer and pour it into a cup of ice & enjoy!
 
Stay Cool!
~ Kerri


Pin It button on image hover